Three hilarious things I’ve learned from a week at my new job:
- Always be prepared to take cover from Nerf gun-touting coworkers. No computer screen (or back of an employee’s head) is safe.
- Nothing fosters interoffice bonding faster than sharing the title and duties of DJ. Turntable allows a group of people to build a collective playlist, listen together, then vote on which songs to keep and which to toss.
- Clients from Hell are hilarious, but sadly all too real.
Can you tell yet that I work with a bunch of nerds?
It’s awesome.
And when I’m not dodging rubber suction darts or jamming to The Black Keys and Kanye, I’m picking up some really valuable design skills. One of the basics I fine-tuned last week was the creation of shadow casts, which are extremely helpful when trying to give the illusion of 3D space within an image. With that, I happily present General Overachiever’s first design tutorial!
General Overachiever's Shadow Casting 101:
Completed in Photoshop CS5
Completed in Photoshop CS5
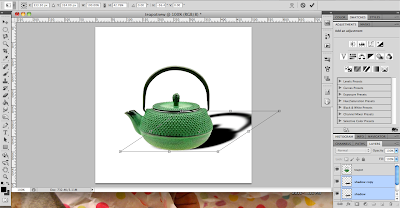
Although I spend most of my time applying shadows to laptops and cell phones, I thought a bright green teapot might be more entertaining for this personal project. To begin, ensure that the image you want to shadow is on a separate layer from its surroundings. I've renamed mine "teapot" for clarification.
Select your equivalent of the "teapot" layer, then duplicate it by hitting Command+J (Ctrl+J for PC users). This duplicate layer will eventually become your shadow, and I've therefore renamed mine "shadow" to differentiate.
While holding down the Command (Ctrl) key, click small icon of the "shadow" layer within the Layers palette. This will create a perfect outline of your shadow-to-be. Using the Paintbrush tool, you can now paint the entire shadow black without worrying about ruining its shape.
With the "shadow" layer still selected, click Blur>Gaussian Blur under the Filter menu. Choose a radius of anywhere between 4 to 7 pixels.
Now that your "shadow" is blurred, move it behind your original "teapot" by clicking and dragging it within the Layers palette. Although unnecessary, I like to duplicate the now-blurred "shadow" to allow for more customization later on.
With the "shadow" layer(s) selected, choose Transform>Distort under the Edit menu. Manipulate the shape of the shadow by clicking and dragging the handles that have appeared within the image.
Adjust the opacity of the "shadow" layer(s) by sliding the toggle near the top of the Layers palette. In this example, I chose to set "shadow copy" at an opacity of 18% and "shadow" at 40%.
Select your "teapot" and all "shadow" layers to move them as a collective object, then reposition them on the canvas as needed.
And voila! You've just moved from 2D to 3D. Congratulations!
Did you find this tutorial helpful? Are there other tricks you'd like to learn? This is still a tentative series, so any and all feedback would be awesome. Thanks for your time, friend!


You are so boss with this regular updating thing. I am very proud and maybe just a little bit jealous.
ReplyDeleteYooooooou flatter me. It's all in the beauty of pre-scheduled posts (sitting down and writing three in two hours? It rocks). But your pride completely melts my heart/makes my day/forces the rain clouds outside to float away.
ReplyDeleteClaire, I'm lovin' this tutorial. Where are you working now? It sounds pretty rad!
ReplyDeleteThe Clients from Hell link was outstanding, but I am tempted to add friends or coworkers. I have asked some ridiculous things about design/computers. + Nice tutorial.
ReplyDeleteRegardless! You still sat down for two hours so you'd get things posted in a regular fashion. Dedication, you has it.
ReplyDelete@Laurie, so so happy you enjoyed it! I'm working at a media company called Thingee Digital. It's only about 12 people big, so employees kind of get to do what they want inside the office as long as they work really hard, too.
ReplyDelete@Meghan, totally understood. Talking with my mom about digital design is always entertaining.
@Gesina, LET'S EAT EMPANADAS.